Nowadays, the ability to screen record on an Android device has become an essential feature. Whether you want to create educational content, share your gaming achievements, or save important video conversations, knowing how to screen record is essential.
This comprehensive guide will take you through the step-by-step process of screen recording on Android 13, catering to both stock Android versions (Android 11 and above) and devices with customised skins such as Samsung’s One UI or Xiaomi’s MIUI.
What’s the First Thing You Should Check?
Before you start, make sure your Android smartphone is capable of screen recording. Although most recent Android smartphones and tablets include screen recording capabilities, it’s always a good idea to double-check.

How to Screen Record on Android? A Step-by-Step Guide
1: Screen Record Using Stock Android
If you’re using a stock Android version, such as Android 11 or later, follow these instructions to screen record:
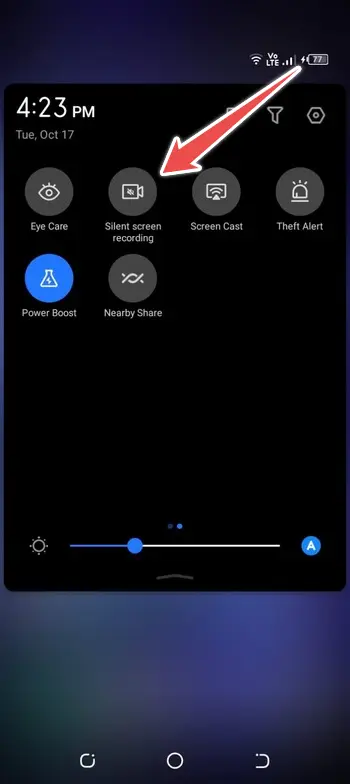
- Swipe down from the top of your screen to open the Quick Settings panel.
- The screen record icon can be found in the Quick Settings panel with ease. Tap it to start the screen recording.
- You may choose to record audio, switch on the front camera, or modify the video quality while recording.
- To stop the recording, hit the stop button in the notification shade or the screen record icon in Quick Settings.
2: Screen Record Using Custom Android Skins
For devices with customised Android skins, like Samsung’s One UI or Xiaomi’s MIUI, the process may vary slightly:
- Swipe down from the top of your screen to access the Quick Settings.
- The location of the screen recording option might vary depending on the device. It could be in the Quick Settings panel or as an option in the Screen Recorder app.
- Configure settings like audio source, video quality, and other preferences.
- Tap the start button to initiate the screen recording.
- To stop recording, return to the Screen Recorder app or use the stop button in the Quick Settings.

3: Managing Screen Recordings
After you’ve captured your screen, you’ll want to manage and share the recordings:
- Screen recordings are often saved in a designated folder in your device’s gallery app.
- You can use third-party video editing applications or the built-in editing features on some devices to cut, make annotations, or make other edits.
- Use email, messaging applications, or cloud storage services for sharing your screen recordings.
Why Should You Consider Troubleshooting Common Issues?
It’s because screen recording can occasionally cause problems. Here we have discussed typical issues and provided solutions.
- Clear up unimportant data to save up space on your smartphone.
- Check that you’ve chosen the proper audio source for recording.
- Restart your device and try again if the screen recording fails.
Conclusion
Whether you have a standard Android version or a customised skin, screen recording on Android provides a versatile and useful way to capture and share your device’s display.
You can easily capture video footage for a variety of purposes by following the particular methods related to your device. Make sure to successfully organise and distribute your recordings, and don’t be afraid to solve any typical difficulties that might develop.
All in all, screen recording is a useful function that allows you to produce content, assist others, and improve your Android experience.
